PostgreSQL Cloud Setup: Production-Ready Database in 5 Minutes with DynHyp [2024 Guide]
Database management doesn't have to be difficult! In this comprehensive guide, we'll explore the most efficient way to deploy PostgreSQL, an essential tool in modern software development, to the cloud. With DynHyp's innovative platform, you can deploy any PostgreSQL version from 12.20 to 17.2 in minutes, manage it securely, and utilize it with maximum performance.
Why Choose DynHyp for PostgreSQL Hosting?
The success of modern applications depends on a robust and reliable database infrastructure. DynHyp has reimagined the PostgreSQL hosting experience by offering:
✓ Automated backup systems
✓ Enterprise-grade security features
✓ Advanced DDoS protection
✓ Customizable resource management
✓ 24/7 technical support
✓ Enterprise-grade security features
✓ Advanced DDoS protection
✓ Customizable resource management
✓ 24/7 technical support
Plus, you can test all features with a 15-day free trial!
What You'll Learn in This Guide
1. PostgreSQL Cloud Deployment
- Step-by-step guide to setting up a production-ready PostgreSQL instance
- Accessing connection details and testing your PostgreSQL server connection
- Managing IP whitelist and security settings
- Configuring automated backup strategies
- Scaling resources according to your needs
Production-Ready PostgreSQL Setup: Step-by-Step Guide
Follow these steps to set up your PostgreSQL database on DynHyp:
1. DynHyp Dashboard Access
- Navigate to Dynhyp Dashboard in your web browser
- Log in with your credentials
- Access your modern and user-friendly dashboard
2. Accessing Database Servers Menu
- Click "Database Servers" in the left menu
- View your existing database servers
- Click "Create Server" next to the PostgreSQL option
3. PostgreSQL Server Configuration
In the "Create New PostgreSQL Database Server" screen:
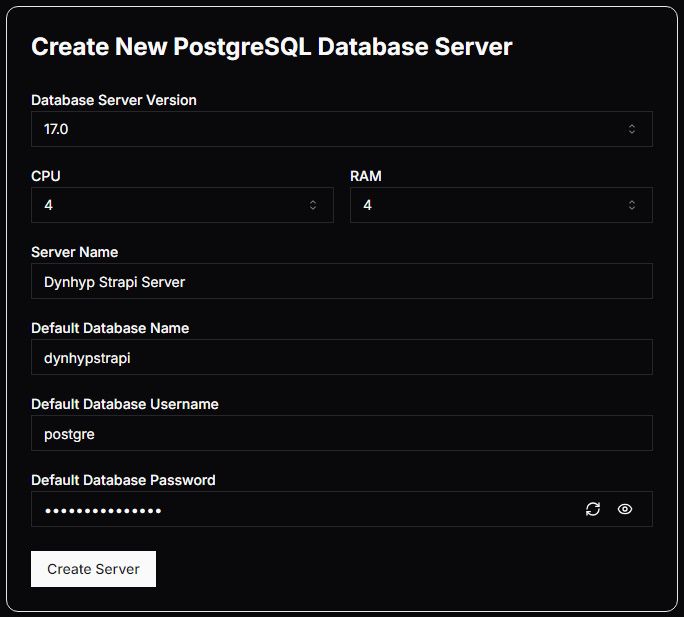
Basic Settings:
- Database Server Version: Select your PostgreSQL version (12.20 to 17.2)
- CPU: Define CPU resources for your server
- RAM: Select appropriate RAM amount
Server Details:
- Server Name: Example format: "Bodrum Islands Postgre Production Server 01"
- Default Database Name: Example format: "postgresdb01"
- Default Database Username: Set your database administrator username
- Default Database Password: Create a strong password
4. Server Creation and Activation
- Click "Create Server" after filling all fields
- System will automatically begin provisioning your server
- Monitor status change from "Creating" to "Active"
Pro Tips:
- 💡 Use descriptive and organized naming for Server Name
- 💡 Choose a meaningful prefix for your database name
- 💡 Include special characters, numbers, and mixed case in your password
- 💡 Plan CPU and RAM selection based on your workload
Accessing Connection Information and PostgreSQL Connection Testing
Follow these steps to access your PostgreSQL server connection details and perform connection testing:
1. Accessing Connection Info
- Click "Database Servers" in the left menu
- Click the three-dot menu (⋮) on the right of your server
- Select "Connection Info" from the dropdown
2. Viewing Connection Details
In the Connection Details screen:
- Select "Node.js" from the programming language dropdown
- Click the ".env" tab to view details in environment variables format
Server Credentials Information:
DB_HOST = short_server_id_.dynhyp.com
DB_USER = db_default_user_name
DB_PASS = db_password
DB_NAME = db_name
3. Connection Code and Testing
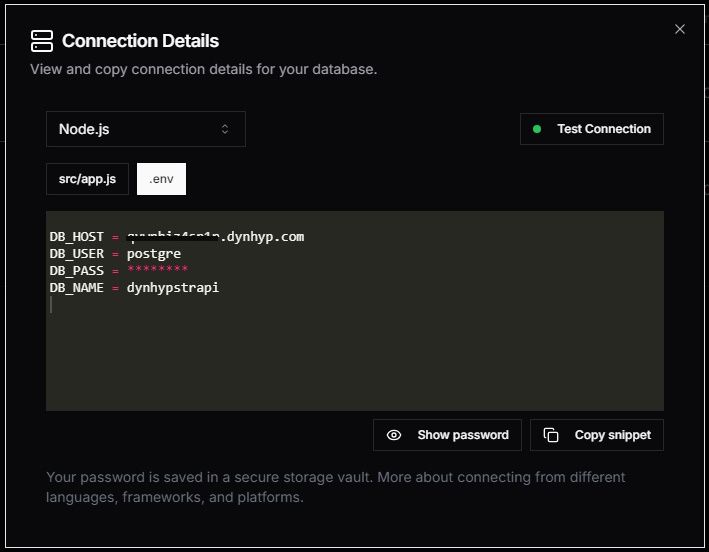
- View Node.js connection code in the "src/app.js" tab
- Use "Copy Snippet" button to copy the ready-to-use connection code
- Implement the copied code in your Node.js application
Testing Connection:
- Click "Test Connection" button in the top right
- On successful connection:
- Green icon appears
- "Connection Successful" toast message displays
Pro Tips:
- 💡 Store credentials securely
- 💡 Use environment variables for connection details
- 💡 Never store passwords in source code in production
- 💡 Regularly test connections to ensure accessibility
Conclusion
Congratulations! With this guide, you've successfully set up your PostgreSQL server on the DynHyp platform and completed connection testing. You now have a production-ready PostgreSQL database. Ensure you store your server credentials securely and remember to use them as environment variables.
PostgreSQL Management Series
Check out our other guides for professional database management:
PostgreSQL Security Settings: IP Whitelist Configuration with DynHyp →
Secure your database with IP whitelist configuration, DDoS protection, and firewall settings.
PostgreSQL Backup Strategies: Automated Backup and Recovery with DynHyp →
Learn about daily, weekly, and monthly backup plans, point-in-time recovery, and disaster recovery strategies.
PostgreSQL Performance Optimization: Resource Management and Scaling with DynHyp →
Optimize CPU, RAM, and storage resources, scale your server according to your needs.
🔔 Pro Tip: We recommend configuring security settings as your next step. Implement IP whitelist configuration now to ensure secure database access.


![PostgreSQL Create User: A Complete Guide [2024]](/_next/image?url=https%3A%2F%2Fstrapi.dynhyp.com%2Fuploads%2Fthumbnail_postgresql_create_user_complete_guide_da94453f66.png&w=256&q=75)